Per Sempre Alfa Magazine Article
Per Sempre Alfa is the offical magazine of the Alfa Romeo Owners Club of Australia (Queensland Division). This is an on-line version of an article originally printed in the magazine and is subject to the Australian Copyright Act. Other than for the purposes of and subject to the conditions prescribed under the Copyright Act, no part of this work may in any form or by any means (electronic, mechanical, photocopying, or otherwise) be reproduced, stored in a retrieval system or transmitted without prior written permission.
Spider Door Trim Overhaul
Vinyl door trims looking a bit tired and twisted in your Alfa? Keith Faulkner describes how he renovated the door trim panels in his Spider using basic techniques and tools.
 Having
had the front seats of my 1972 Spider Veloce successfully reupholstered,
the vinyl door trim panels were now looking decidedly sub-standard. The
vinyl covering was in reasonably good condition (although scuffed and
faded in a few places) but the panels themselves were severely warped.
In addition, the imitation-chrome plastic accent strips had shed, or were
shedding, their metallic finish and every week I would clean their dandruff-like
silver deposits off the seats. It was clear that an overhaul was in order.
Having
had the front seats of my 1972 Spider Veloce successfully reupholstered,
the vinyl door trim panels were now looking decidedly sub-standard. The
vinyl covering was in reasonably good condition (although scuffed and
faded in a few places) but the panels themselves were severely warped.
In addition, the imitation-chrome plastic accent strips had shed, or were
shedding, their metallic finish and every week I would clean their dandruff-like
silver deposits off the seats. It was clear that an overhaul was in order.
The construction of the trim panels is pretty much standard for the automotive industry of the period. They consist of upholstery vinyl wrapped around a hardboard panel, with a decorative pattern heat-welded in-situ. Being a timber-based product, age and the long-term effects of weather take their toll on the hardboard. (Rule one of open-top motoring states: "Eventually, thou shall get wet.") An occasional wetting and drying, in conjunction with our relatively humid sub-tropical climate means warping of the trim panels seems inevitable.
Reproduction trim panels are readily available from suppliers in the UK, with prices ranging from 20-100 pounds. However, as the vinyl on my doors was original and in reasonably good condition, I decided I would try to just replace the hardboard backing panels. I could have, of course, simply replaced them with another piece of hardboard, but this was a job I didn't want to have to do again ten years from now. Indeed, I didn't even want the next owner of the Spider, my son Rowan, to have to do it again, so I determined to use a material that would be tough, light, moisture-proof and dimensionally stable over a long period.
Accordingly, I purchased two 900mm x 600mm sheets of 4mm clear acrylic plastic sheet from my local hardware. This is an UV-stabilised exterior-grade product that is often used for windows. I wasn't particularly looking for a clear product, but as it turned out this came in handy when I was test-fitting the panels to the doors. I also picked up a couple of fresh fine-tooth blades for my jig-saw, a can of photo-mounting spray adhesive and a small tin of brushable contact adhesive. Buying such small sheets of acrylic from a local hardware is not the most cost-effective way and if you are considering using this material, there are other places you can buy it much cheaper.
 With
the replacement raw material acquired, it was time to remove the
door panels from the car, a fairly straightforward process. The
first step is to remove the window-winder handles and the door-release
levers. These are held onto their respective splined shafts with
circlips. Patient prodding with a thin screwdriver or thin strip
of metal eventually releases the clips. Care should be exercised
to ensure that the circlip doesn't release suddenly and end up lodged
in your eye, or worse, lost under the workbench.
With
the replacement raw material acquired, it was time to remove the
door panels from the car, a fairly straightforward process. The
first step is to remove the window-winder handles and the door-release
levers. These are held onto their respective splined shafts with
circlips. Patient prodding with a thin screwdriver or thin strip
of metal eventually releases the clips. Care should be exercised
to ensure that the circlip doesn't release suddenly and end up lodged
in your eye, or worse, lost under the workbench.
For reasons only known to the Italian designers who planned the interior, the pull handle on the driver's side is different from that of the passenger side. The rationale isn't immediately obvious to me as, irrespective of the left-hand drive versus right-hand drive issue, I don't think either would get in the way of the driver. Anyway, on my Spider the driver's side pull handle is a somewhat delicate chromed-metal folding horizontal affair, while the passenger side is fitted with substantial inclined cast-aluminium fixed item that wouldn't look out of place in a tank.
The horizontal pull is held in place with one screw through each of its two retaining hinges. The handle on the passenger side has its top held in place under a metal loop welded to the door and its bottom attached with a screw. A few minutes work with a screw-driver and the handles were free.
All of the screws, circlips, washers and other sundry bits and pieces went into plastic zip-loc bags which I labeled so I would know what went where when it came time for reassembly.
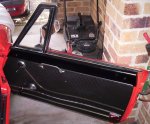
When new, the panels were attached to the doors with hidden metal clips. These metal clips seem to have a habit of disappearing over the years - probably ending up where all those missing socks go when they disappear from the washing machine. Either that or the degree of warping in the panel exceeds a clip's ability to hang on and the owner needs to find an alternative fixing method. Just about every "original" Spider I have seen has the door trim panels attached with various combinations of screws around the edge.
In my case, the bottom edges of the panels were held in place with four equally-spaced screws, covered with clip-on plastic caps. The top plastic door mouldings, which also hold the upper edge of the panels in place, were fastened with another two screws each.
 With
all the door hardware removed, I backed-out the screws holding the
bottom of the panel in place and unclipped the panel. The panels
can easily be pulled free from the doors without removing the top
capping pieces, but I eventually removed these pieces anyway to
clean them. A clear plastic sheet is sandwiched between the trim
panel and the metal of the door to act as a moisture barrier. I
carefully peeled this away and set it aside.
With
all the door hardware removed, I backed-out the screws holding the
bottom of the panel in place and unclipped the panel. The panels
can easily be pulled free from the doors without removing the top
capping pieces, but I eventually removed these pieces anyway to
clean them. A clear plastic sheet is sandwiched between the trim
panel and the metal of the door to act as a moisture barrier. I
carefully peeled this away and set it aside.
With the panels removed, I laid them out on the garage floor to work on them. I placed an old blanket down first to protect the vinyl and provide a more forgiving surface for my poor old knees. The first chore was to remove any of the remaining fake-chrome still adhering to the accent strips. My plan was to eventually spray the finished panels with black vinyl paint so I needed a clean surface to ensure a good key. This would mean the accent strips would be black, but I have usually found that consistency and neatness is as important as originality. Neat, straight black strips worked better for me than warped, flaking original strips.
Now, there is a natural law I refer to as "Faulkner's Law of Disassembly" which goes like this: "Disassembly will proceed smoothly until the very last item. This item will be stuck, frozen, seized, or otherwise stubbornly resist removal, causing immense frustration, cursing of every deity known to humans and the hurling of perfectly innocent tools across vast distances." I usually encounter this law when, after having unscrewed a hundred screws without incident, the last one seems welded in place for no apparent reason.
 For
the door trims, the operation of this law meant that one of the
accent strips on the door panel had retained its metallic covering
in near perfect state. While the coverings on the other strips crumbled
at a touch, this one strip task retained it's chrome with impressive
tenacity. It took me half-an-hour of patient scraping with the blade
of a screw driver and a razor blade before the accent strip was
back to its raw plastic state.
For
the door trims, the operation of this law meant that one of the
accent strips on the door panel had retained its metallic covering
in near perfect state. While the coverings on the other strips crumbled
at a touch, this one strip task retained it's chrome with impressive
tenacity. It took me half-an-hour of patient scraping with the blade
of a screw driver and a razor blade before the accent strip was
back to its raw plastic state.
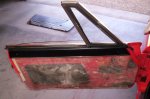
Each panel has a red reflector fitting located at the bottom corner. These detach easily by backing out the fixing screws from the rear of the panel. I then removed the million staples that the factory upholsterer had used to fasten the vinyl overlap to the back of the panel and at last I was ready to remove the vinyl covering. The heat process used to form the decorative pattern on the face of the vinyl had lightly fused the material to the face of the hardboard, so I gently worked my hand between the two surfaces until the vinyl was free. The white fibre padding material also came away cleanly with the vinyl and I set them aside in a safe place.
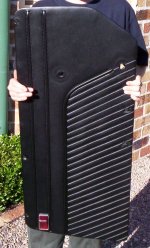
The hardboard panels were now able to be used as templates for cutting replacements out of the acrylic sheets. With Rowan standing on top of the panels to flatten them as much as possible, I carefully traced the shape of the panels onto the acrylic with a fine-tip permanent marker. I made sure to include the location of all the holes and openings.
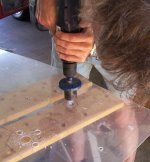 Using
various size drills as well as a hole-saw, I replicated all the
original openings in the acrylic sheet. I find that slow speeds
and patience are the order-of-the day when working with plastics.
Spade bits, rather than twist drills, create neater holes without
grabbing or chattering. Drilling halfway through from one side,
then flipping over and finishing the hole from the other side prevents
cratering and cracking.
Using
various size drills as well as a hole-saw, I replicated all the
original openings in the acrylic sheet. I find that slow speeds
and patience are the order-of-the day when working with plastics.
Spade bits, rather than twist drills, create neater holes without
grabbing or chattering. Drilling halfway through from one side,
then flipping over and finishing the hole from the other side prevents
cratering and cracking.
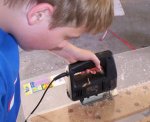
With all the holes cut, I then turned it over to Rowan to cut around the shape of the panel, using a variable-speed jigsaw with a fine-tooth plastic blade. Again, care and patience resulted in a neat, clean cut requiring minimal clean-up.
 Using a small hand-plane I smoothed the edges of the acrylic, ensuring
that there were no sharp edges that would chafe against the vinyl
when it was stretched over the panel. Final smoothing was done with
wet-and-dry sandpaper.
Using a small hand-plane I smoothed the edges of the acrylic, ensuring
that there were no sharp edges that would chafe against the vinyl
when it was stretched over the panel. Final smoothing was done with
wet-and-dry sandpaper.
I test-fit the panels to the doors to check the results. The clear acrylic made it easy to see if the holes were correctly located or needed opening-out some more. While the acrylic sheets were accurate copies of the original hardboard ones, I still found I had to adjust the location of the holes around the door-release opening. There are three holes surrounding the central hole through which the spline of the door release passes. The three holes provide clearance for the screws that fasten the door release mechanism in place and a couple of screws were fouling the holes in the panel. However, it only took a few minutes to increase the size of the holes slightly to ensure that there would be nothing preventing the new panels sitting perfectly flat on the doors.
At this point, I decided that I would leave the plastic moisture-barrier sheets off when I reattached the trim panels. The panels would fit more smoothly and the acrylic sheet would not need protecting from moisture in the same way the hardboard did. I stored the plastic sheets away safely. In the rare instances I haven't replaced parts on the Spider, or replaced old parts with replacements, I make sure I retain the original bits and pieces for future reference or reinstatement.
I was now ready to overlay the acrylic panels with the vinyl. I test-fit the vinyl to make sure the holes in it lined up with those in the panel and there was enough vinyl overlap to wrap around the acrylic and fasten it to the back. To ensure the vinyl wouldn't sag or stretch over time, I sprayed the face of the acrylic with the photo-mount adhesive. Spraying just the panel results in a semi-permanent bond so that the vinyl can be removed again without damage if necessary. I laid the vinyl on the floor and carefully lowered the acrylic sheet onto it. Again, the transparency of the acrylic made it much easier to line things up and make sure there were no wrinkles in the vinyl.
 The
original method of stapling the vinyl overlap to the back of the
hardboard panel would obviously not work for the acrylic, so I used
contact adhesive instead. I applied an even coating of adhesive
to the overlapping vinyl edge as well as the mating surface of the
acrylic panel. I used a toothbrush to work the adhesive into the
back of the vinyl to ensure a good bond. After about twenty minutes,
when the contact adhesive was touch-dry, I brought the two surfaces
together. I worked my way around the panel, pulling the vinyl firmly
over the panel, but not too tightly, in deference to its age. To
finish off the back of the panel neatly, I ran duct tape over the
exposed vinyl edges.
The
original method of stapling the vinyl overlap to the back of the
hardboard panel would obviously not work for the acrylic, so I used
contact adhesive instead. I applied an even coating of adhesive
to the overlapping vinyl edge as well as the mating surface of the
acrylic panel. I used a toothbrush to work the adhesive into the
back of the vinyl to ensure a good bond. After about twenty minutes,
when the contact adhesive was touch-dry, I brought the two surfaces
together. I worked my way around the panel, pulling the vinyl firmly
over the panel, but not too tightly, in deference to its age. To
finish off the back of the panel neatly, I ran duct tape over the
exposed vinyl edges.
Again, I test-fit the panels to the doors to ensure everything still lined up. I now had nice straight panels and it was time to turn my attention to the vinyl itself. I removed the panels once more and also detached the plastic mouldings that run along the top of the doors. With the items laid out on the garage floor, I set to work with a spray can of upholstery cleaner and a stiff brush to get rid of decades of ingrained dirt and grease, paying particular attention to the crevices and creases.
 Once
everything was clean, I gave the surfaces a wipe over with a rag
moistened with turpentine and took all the pieces outside so Rowan
could get to work with the spray can of vinyl paint. The "paint"
is not really a paint, nor is it a dye; it is liquid vinyl that
bonds to the original plastic surface, in effect increasing the
thickness of the original surface by a few microns. I have used
the product a few times before and am satisfied with its coverage
and longevity. The finished surface can be treated just like the
original vinyl and a regular dressing with Armorall or equivalent
keeps it looking good.
Once
everything was clean, I gave the surfaces a wipe over with a rag
moistened with turpentine and took all the pieces outside so Rowan
could get to work with the spray can of vinyl paint. The "paint"
is not really a paint, nor is it a dye; it is liquid vinyl that
bonds to the original plastic surface, in effect increasing the
thickness of the original surface by a few microns. I have used
the product a few times before and am satisfied with its coverage
and longevity. The finished surface can be treated just like the
original vinyl and a regular dressing with Armorall or equivalent
keeps it looking good.
The panels and plastic top mouldings required approximately one-and-a-quarter cans of the vinyl spray. Like any other spray application, the secret to a good finish is lots of light coats rather than a couple of heavy ones. While the vinyl spray is not a paint, thick or uneven coats can still cause runs and unless the can nozzle is kept clean, you risk getting splatters across the work.
With the panels set aside to dry, I took opportunity to clean and polish all the door hardware while they were off the doors. I also lubricated the door winder and locking mechanisms. For good measure I sprayed the inside of the doors with rust preventative - something which has almost become second nature whenever I remove a part from the Spider that allows access to inner recesses.
As I only had about half of the original retaining clips, the refurbished panels would still need to be reattached to the doors with screws. Besides which, the holes and indentations in the vinyl from the existing screws remained very much visible so reusing them was also necessary from an aesthetic point of view.
Wherever possible, I replace any screws I remove from the Spider with identical stainless-steel ones, but in this case the original screws that had held the panels in place were a mixed bag of lengths and sizes. I selected a short-length stainless steel screw whose head would fit inside the plastic cover-caps and tested which existing holes in the door it would fit. A couple of the holes were oversize for the new screws, but through trial and error I found that I could re-drill a new smaller pilot hole a millimeter or two to one side without causing a problem with the final appearance.
 Only
one oversize hole presented a real problem, so I filled it in with
epoxy, also epoxying a small square of plastic behind it. When the
epoxy had hardened, I drilled a correct-size pilot hole for the
new screw.
Only
one oversize hole presented a real problem, so I filled it in with
epoxy, also epoxying a small square of plastic behind it. When the
epoxy had hardened, I drilled a correct-size pilot hole for the
new screw.
The next day, with the panels dry, I refitted the reflectors and clipped the panels back onto the doors. I considered applying small dabs of silicone caulk around the centre areas of the door before refitting the panels to reduce the likelihood of vibration, but in the end I refitted the panels "dry". So far, everything has been quiet and relatively vibration free.
I worked the top plastic moulding back into position and screwed everything in place with the new stainless steel screws. The final stage was refitting the door hardware and snapping the black plastic covers over the screw heads.
The finished result is a significant improvement on the original warped panels and complements the reupholstered seats nicely. Unfortunately, while sitting back admiring my handiwork I noticed that the gear lever boot was looking decidedly shabby...