Per Sempre Alfa Magazine Article
Per Sempre Alfa is the offical magazine of the Alfa Romeo Owners Club of Australia (Queensland Division). This is an on-line version of an article originally printed in the magazine and is subject to the Australian Copyright Act. Other than for the purposes of and subject to the conditions prescribed under the Copyright Act, no part of this work may in any form or by any means (electronic, mechanical, photocopying, or otherwise) be reproduced, stored in a retrieval system or transmitted without prior written permission.
Spider Seats Overhaul
Seats, particularly drivers' seats, take a lot of battering during the life of a car. Keith Faulkner discusses how he approached renovation of the front seats in his Spider.
 When
I acquired my 1972 Spider Veloce, the driver and passenger seats
were fitted with good quality lambswool seat covers. As comfortable
as these covers were, I prefer the appearance and feeling of the
original black vinyl upholstery, despite what this means in our
sub-tropical Queensland climate. I consider a sweat-soaked back
and scorched bum as badges of honour for the dedicated convertible
driver in our Sunshine State!
When
I acquired my 1972 Spider Veloce, the driver and passenger seats
were fitted with good quality lambswool seat covers. As comfortable
as these covers were, I prefer the appearance and feeling of the
original black vinyl upholstery, despite what this means in our
sub-tropical Queensland climate. I consider a sweat-soaked back
and scorched bum as badges of honour for the dedicated convertible
driver in our Sunshine State!
Unfortunately, the seats in my Spider - particularly the driver’s
side - were showing significant signs of wear, with broken stitching
and cracks beginning to appear in the headrests. I nursed them for
as long as I could, but eventually had to bite the bullet and get
them re-upholstered.
For owners of classic cars, it is usually an event such as a forthcoming car show or special Club outing that triggers a flurry of tidy-up activity. In the case of my Spider’s seats it was a visit from my older brother - an Australian expatriate living in Chicago - who was returning to Australia for his first visit in 30 years. I figured that sightseeing from the passenger seat of the Spider would be an ideal way to re-introduce my sibling to Brisbane, but I first had to get the upholstery a bit more presentable.
One of the reasons I had procrastinated with the seats was because I hadn't been able to find a local upholsterer I felt could do a half-decent job. Fortunately, I discovered Heritage Motor Body Trimmers at Geebung, on Brisbane’s northside. The owner, Michael Elmes learnt his trade in England working on classic marques such as Bently, Rolls Royce and Jaguar before moving to Australia. Michael is no stranger to Alfas, at one time having even owned a Giulietta.
I selected a low-sheen marine-grade vinyl with a grain very close to that of the existing seats to provide a long-wearing material with good grip and feel. Having agreed on a price, I arranged to drop the seats off with Michael in a fortnight, which gave me time to remove the seats from the car and dismantle them. I had already decided that, as I was going to the trouble of getting them re-upholstered, I would tidy up the other parts of the seats at the same time.
Seemed a simple plan at the time.
Now, as any Alfa owner knows, there is no such thing as a simple plan when it comes to our cars. One small job leads to another and before you realise it, changing a light bulb ends up as a complete suspension overhaul! Re-upholstering the seats turned out to be much more than that, but it was all worthwhile.
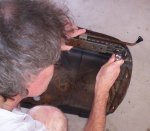
I had removed the seats from the Spider once before - just after I had bought it - to do a through inspection of the floor pan and sills, and remembered that one of the bolts securing the seat runners to the floor had a stripped thread. I would need to sort that before the seats went back in this time. In preparation, I borrowed a suitable tap from a mate at work (one of those people who seems to have every tool on the planet) and, once I had removed the seats, I addressed the problematic threaded hole in the floor bracket. As it turned out, the “stripped” hole was really just packed full of hardened accumulated gunk and once I had run the tap through it a few times everything was sweet. I used the tap to clean out the other bolt holes while I was at it and test-fit all the bolts to make sure they ran true.
 Returning
to the seats, I unbolted the runners from the pressed-steel seat
pans and set them aside for cleaning. While the seats are hardly
a complex piece of engineering, I nevertheless had a supply of zip-lock
plastic bags on hand into which I placed the various bolts, washers
and other bits and pieces. My memory, never great, is only getting
worse with age, so bagging and labeling parts is a must if I intend
to re-assemble something even remotely resembling the original item
with which I began. While it would have been vastly entertaining
to reassemble a toaster from Alfa Spider seats, I felt it much more
desirable to actually end up with something I could sit my bum in
and legally drive the car!
Returning
to the seats, I unbolted the runners from the pressed-steel seat
pans and set them aside for cleaning. While the seats are hardly
a complex piece of engineering, I nevertheless had a supply of zip-lock
plastic bags on hand into which I placed the various bolts, washers
and other bits and pieces. My memory, never great, is only getting
worse with age, so bagging and labeling parts is a must if I intend
to re-assemble something even remotely resembling the original item
with which I began. While it would have been vastly entertaining
to reassemble a toaster from Alfa Spider seats, I felt it much more
desirable to actually end up with something I could sit my bum in
and legally drive the car!
It was interesting to note the considerable differences between the construction of the Spider’s seats and the seats of my 1989 Alfa 75. I had some upholstery repairs made to the driver’s side seat of the 75 a couple of years ago and it is clear that the seat’s structure is intended to make it an integral part of the occupant safety restraint system.
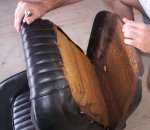 By
contrast, the Spider’s seats give the impression of simply
being something that keeps your rear-end off the floor. The seat
squab is attached to the pressed-steel pan with some thin metal
clips and the frame of the seat-back is a relatively light-weight
affair attached to the seat pan via the recliner mechanism bracket.
Most if the “structure” of the seat appears to be the
shaped-foam inserts.
By
contrast, the Spider’s seats give the impression of simply
being something that keeps your rear-end off the floor. The seat
squab is attached to the pressed-steel pan with some thin metal
clips and the frame of the seat-back is a relatively light-weight
affair attached to the seat pan via the recliner mechanism bracket.
Most if the “structure” of the seat appears to be the
shaped-foam inserts.
After I had reduced the seats to their component parts, I attacked the metal items with degreaser, “universal solvent” (ie: petrol), wire brushes and sandpaper. While I was cleaning up the seat pans I discovered why they had a plastic edge moulding fitted. The unfinished steel edges are sharp – razor sharp.
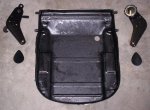
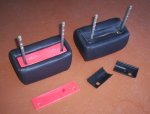
The side brackets attaching the seat back to the seat pan have tear-drop shaped plastic covers that fit over the attachment bolts and hide them from view. One of these covers was missing, so I traced the shape onto a sheet of thin styrene that I obtained from a hobby shop. The original covers clip into place, but as disassembling the seats is not a common occurrence, I planned to affix my replacement with contact adhesive when I put everything back together. If I ever had to get the cover off again, it would be no big deal.
Another minor repair was a replacement knob for the end of the bracket lever that disengages the seat lock, enabling the seats to tilt forward. The knob on the driver's seat was missing and the exposed end of the metal lever had torn a small gash in the vinyl seat covering. Obviously, I didn't want the same to occur to my new coverings, so I fashioned a replacement from a 30mm length of 16mm diameter timber dowel. Using two different size drills, I drilled a stepped hole into the dowel to ensure a snug fit over the stepped lever. I rounded the end of the new knob and sanded the timber smooth with fine sandpaper. After test fitting the knob, I mixed up some epoxy and attached the dowel to the lever. I propped the bracket at an angle to ensure that the epoxy didn't flow out and set it aside to cure.
 With
all the parts cleaned up and prepared, I masked-off the chrome adjustment
knob of the recliner bracket, then sprayed all the items, including
the runners, with several thin coats of black satin epoxy enamel.
In a couple of days, with the paint cured, I dropped everything
except the seat runners off at the upholsterer for Michael to do
his stuff, arranging to pick them up in a week or so.
With
all the parts cleaned up and prepared, I masked-off the chrome adjustment
knob of the recliner bracket, then sprayed all the items, including
the runners, with several thin coats of black satin epoxy enamel.
In a couple of days, with the paint cured, I dropped everything
except the seat runners off at the upholsterer for Michael to do
his stuff, arranging to pick them up in a week or so.
Back in the garage, the Spider looked somewhat empty and forlorn, so the next weekend I decided to take the opportunity to strip out the interior mats and give everything a good clean. The floor mats slipped out fairly easily, but the seat belts needed to be removed to allow the sill mats and the transmission tunnel mat to be folded back. To fully remove these mats requires drilling out the rivets that hold down the stainless-steel sill trims and forcing the centre mat over the handbrake, so I was content just to hold them out of the way with clamps for the clean-up.
 With
the mats removed or out of the way, it was time to get down and
dirty with scrapers, stiff brushes, various solvents and lots of
elbow grease. The sound-deadening sheeting was mainly intact, but
most of the mat underlay had crumbled away or mixed with grime to
form a layer of glue-like gunk. Many hours later, with three decades
of accumulated muck removed (or more correctly, transferred to my
hands and arms) I sprayed the floor with rust-converter as a preventative
measure, allowing it to seep into all the nooks and crannies.The
next day I applied a couple of generous coats of Killrust epoxy
enamel to the floor panels. Surprisingly, the stock Killrust colour
“Delicious Red” is an excellent match to my Spider’s
duco - more than acceptable considering the floor is hidden from
view under the mats.
With
the mats removed or out of the way, it was time to get down and
dirty with scrapers, stiff brushes, various solvents and lots of
elbow grease. The sound-deadening sheeting was mainly intact, but
most of the mat underlay had crumbled away or mixed with grime to
form a layer of glue-like gunk. Many hours later, with three decades
of accumulated muck removed (or more correctly, transferred to my
hands and arms) I sprayed the floor with rust-converter as a preventative
measure, allowing it to seep into all the nooks and crannies.The
next day I applied a couple of generous coats of Killrust epoxy
enamel to the floor panels. Surprisingly, the stock Killrust colour
“Delicious Red” is an excellent match to my Spider’s
duco - more than acceptable considering the floor is hidden from
view under the mats.
As a side note, my car's "red" seems to be unusual for Kamm-tail Spiders and more like that associated with round-tail models. My Spider is a 1971-build/1972-complianced model and the colour appears to be "Rosso Montecatino". To my eyes, it can be best described as having a pinky-orange tint to the red, depending on the light. The typical Kamm-tail red seems to be "Rosso Carmen" or "Rosso Zagoto".
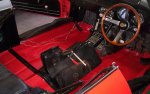
While the floor paint dried overnight, I gave all the mats a through cleaning and dressing with Armoural. The driver’s mat has various slots and openings to fit around the pedals and accelerator stop, but some of these had begun to split around the edges. I still have not decided whether I will eventually fit custom carpets, or maintain originality by purchasing rubber replacements mats. As an interim fix, I attached a small carpet mat to the original rubber mat with heavy-duty press-studs, which reinforced the split areas as well as providing a cushioned heel pad in front of the pedals.
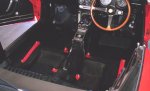 Before
I replaced the floor mats, I cut pieces of thick carpet (left over
from when I had my house re-carpeted) to fit the recesses in the
floor panels. These made up for the long-gone original mat underlay
and also provided some padding and insulation. I attached the carpet
pieces to the back of the rubber mats with double-sided tape so
they wouldn't wander around then coaxed all the mats back in place
and refitted the seat belts.
Before
I replaced the floor mats, I cut pieces of thick carpet (left over
from when I had my house re-carpeted) to fit the recesses in the
floor panels. These made up for the long-gone original mat underlay
and also provided some padding and insulation. I attached the carpet
pieces to the back of the rubber mats with double-sided tape so
they wouldn't wander around then coaxed all the mats back in place
and refitted the seat belts.
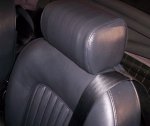
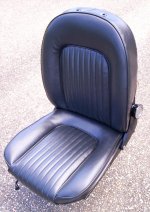 Everything
was now ready for the seats. I called around to Heritage Trimming
to see how things were progressing. The seats were finished, but
the headrests were taking a bit longer than expected. As the seat
foam inserts are symmetrical, Michael had swapped the driver’s
squab with the passenger side to even out the wear, based on the
reasonable assumption that there is always a driver, but not always
a passenger. I loaded the seats into the Alfa 75 and returned home
to reunite them with the rest of the Spider.
Everything
was now ready for the seats. I called around to Heritage Trimming
to see how things were progressing. The seats were finished, but
the headrests were taking a bit longer than expected. As the seat
foam inserts are symmetrical, Michael had swapped the driver’s
squab with the passenger side to even out the wear, based on the
reasonable assumption that there is always a driver, but not always
a passenger. I loaded the seats into the Alfa 75 and returned home
to reunite them with the rest of the Spider.
The first task was to reattach the runners to the underside of the seats and give them a bit of grease to ensure they moved smoothly. I then attached my replacement tear-drop plastic cover to the side bracket with contact adhesive.
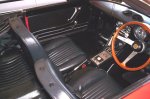 With
the bolt holes in the floor brackets cleaned out, the seats went
back into the car in a few minutes and I finished to job by giving
them a wipe over with Armoural to clean off any marks.
With
the bolt holes in the floor brackets cleaned out, the seats went
back into the car in a few minutes and I finished to job by giving
them a wipe over with Armoural to clean off any marks.
As the car had been idle for a few weeks, I fired her up and went for a drive to get the feel of the new upholstery (as if I needed and excuse to spend an hour on the highway with the Spider).
A couple of weeks later, Michael called to tell me the headrests were ready. The challenge had been that the original vinyl covering had fused to the foam core over the years. Trying to remove it would have damaged the foam, leaving no option but to re-cover the whole lot with new vinyl. Without the originals being able to be removed and used as patterns, the new covering was a trial-and-fit affair which was time consuming, but the end result was worth the effort.
 To
further complicate matters, the plastic mouldings that originally
fitted into the underside of the headrest and clamped the ends of
the vinyl were warped or broken. I decided to fashion new replacement
cover plates and looked around for a suitable material. Eventually,
I found a cheap kitchen cutting board, made of a tough, slightly
flexible plastic that was ideal. Using the original plates as a
pattern, I cut two new plates to size, then drilled and countersunk
fixing holes.
To
further complicate matters, the plastic mouldings that originally
fitted into the underside of the headrest and clamped the ends of
the vinyl were warped or broken. I decided to fashion new replacement
cover plates and looked around for a suitable material. Eventually,
I found a cheap kitchen cutting board, made of a tough, slightly
flexible plastic that was ideal. Using the original plates as a
pattern, I cut two new plates to size, then drilled and countersunk
fixing holes.
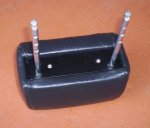 Once
I was happy with the fit, I sprayed the cover plates with a couple
of coats of black paint and set them aside to dry. I polished the
headrest shafts with metal cleaner then screwed the cover plates
in place before sliding the headrests back onto the seats.
Once
I was happy with the fit, I sprayed the cover plates with a couple
of coats of black paint and set them aside to dry. I polished the
headrest shafts with metal cleaner then screwed the cover plates
in place before sliding the headrests back onto the seats.
The seat belts in my Spider are of the manually-adjustable type. One of the little niggling things with these is their tendency to work their way off your shoulder, even though I adjust them to be quite firm.
Studying photos or other convertibles, I noticed that many of them have plastic fittings on the seats through which the seat belts run, thus keeping them on the shoulder. The later-series 105 Spiders have what looks like a substantial bracket attached to the seat.
I contemplated a number of ways I could fabricate something similar and even visited my local boating accessory shop to check out their range of sail-boat rigging cleats to see if there was something I could adapt. In the end I decided to adhere to the K.I.S.S. principal and simply looped a length of black nylon cord around the seat belt and the headrest shaft. It works and is virtually invisible.
 So
there you have it. A "simple" re-upholstery job that turned
into significant interior overhaul. Nothing concours standard by
any stretch of the imagination, but personally quite satisfying
and a pleasant way to while away a few hours in the garage.
So
there you have it. A "simple" re-upholstery job that turned
into significant interior overhaul. Nothing concours standard by
any stretch of the imagination, but personally quite satisfying
and a pleasant way to while away a few hours in the garage.
The only trouble is that the refreshed seats and floor mats now made the door trims look decidedly sub-standard. Have to do something about that, I guess. Should be fairly simple...