Per Sempre Alfa Magazine Article
Per Sempre Alfa is the offical magazine of the Alfa Romeo Owners Club of Australia (Queensland Division). This is an on-line version of an article originally printed in the magazine and is subject to the Australian Copyright Act. Other than for the purposes of and subject to the conditions prescribed under the Copyright Act, no part of this work may in any form or by any means (electronic, mechanical, photocopying, or otherwise) be reproduced, stored in a retrieval system or transmitted without prior written permission.
Spider Tyres
Keith Faulkner fits tyres to a set of original Campagnolo alloy wheels for his Spider (Published in October 2008 issue of the Magazine).

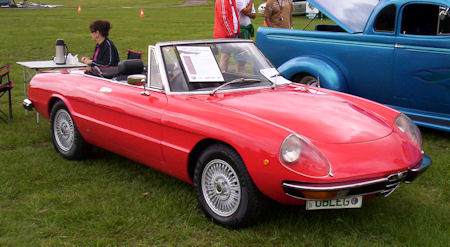
In the previous instalment of this article, I described how I had restored a set of original Campagnolo Turbina-style alloy rims, offered as a factory option for 105 Series Spiders in the 1970s. With the rims now complete, I was now ready to select new tyres and have them fitted to my own 1972 Spider Veloce.
Of all the non-electronic advances in automotive technology since the 1970s, tyres are probably close to the top of the list. The improvements in tyre longevity, ride and handling are quite amazing and it is rarely appreciated how much modern tyre technology has contributed to overall road safety.
The owner's handbook for my Spider lists 14 x 165 HR tyres as the recommended fitment on the standard 5" wide steel rims. Typically, these cars were delivered with Michelin XAS, Pirelli Cinturato or Continental TT 714 rubber.
Finding an equivalent modern radial tyre to substitute, however, is not as easy as it seems. Tyre widths and profiles offered by the major tyre manufacturers have changed considerably to keep pace with new car development. So, after crunching the numbers through a calculator, I eventually decided to go with 185 x 70 tyres, which have a rolling diameter close to that of the originally-specified tyres, thus keeping gearing and speedometer readings unchanged.
Also, as my Spider has stock suspension and steering, I didn't want to "over tyre" the car, making for heavy steering and placing strain on various components. There have been reports of damaged steering components and distorted chassis areas on some early unmodified 105 Spiders running massive rubber.
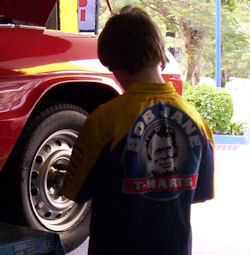
I contacted the Bob Jane T-Mart store at Taringa to check what tyres were readily available in this size. Milton Clarke, the franchisee of this outlet, is a long-time advertiser in Per Sempre Alfa and a supporter of the club, having hosted tech nights at his workshop. Milton was on holidays when I called, but I was well looked after by Scott and his crew.
I don't have any plans to take the Spider onto a racetrack and most outings in the car are relaxing country drives, so my specification was for a comfortable, quiet tyre, but without sacrificing performance too much. After some consideration, Scott recommended a set of Pirelli 3000 tyres for the Spider. Scott also generously gave permission for me to hang about in the workshop while the new rubber was fitted so I could take photos for this article.
Scott nominated the quietest time of the week I should bring the car in so my presence in the workshop would be least disruptive to their day. I duly arrived at the appointed hour with the reborn Campagnolos loaded into the boot and back seat of the Spider.
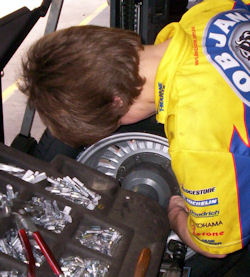
 First order of business was to get the Spider up on the hoist
and remove the old wheels. This allowed us to check the wheel studs and
confirm they were all the same "handed" and long enough to accept the
alloy rims. Most 1750cc 105 Series cars have short left-hand-thread lug
nuts on the left side and right-hand-thread lug nuts on the right side,
whereas 2000cc models usually have long right-hand-thread lug nuts on
both sides and acorn-head wheel nuts with shoulders to retain the
stainless-steel wheel centres.
My Spider was the first of the 2000cc models, manufactured in 1971, and
it was not inconceivable that it had short mixed-handed wheel studs.
Alfas rolling off the production line at times of model changes
sometimes had an interesting mix of old and new - almost as if the
factory workers used up whatever was on the parts-shelf if it fit!
First order of business was to get the Spider up on the hoist
and remove the old wheels. This allowed us to check the wheel studs and
confirm they were all the same "handed" and long enough to accept the
alloy rims. Most 1750cc 105 Series cars have short left-hand-thread lug
nuts on the left side and right-hand-thread lug nuts on the right side,
whereas 2000cc models usually have long right-hand-thread lug nuts on
both sides and acorn-head wheel nuts with shoulders to retain the
stainless-steel wheel centres.
My Spider was the first of the 2000cc models, manufactured in 1971, and
it was not inconceivable that it had short mixed-handed wheel studs.
Alfas rolling off the production line at times of model changes
sometimes had an interesting mix of old and new - almost as if the
factory workers used up whatever was on the parts-shelf if it fit!
The handedness of Alfa wheel stud threads has caught more than one tyre-fitter out, with the resulting stripped threads or broken studs being an inconvenience for all. Fortunately, my Spider had "normal" long right-handed threads which meant that the thicker alloy rims would seat properly and we could fit a set of nice new chrome nuts to the wheels instead of re-using the standard steel shouldered-dome nuts.
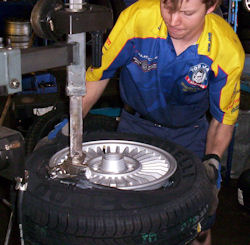 While Scott and one of his chaps were removing wheels and
sorting nuts, another of the crew was fitting the new Pirellis to the
Campagnolos.
While Scott and one of his chaps were removing wheels and
sorting nuts, another of the crew was fitting the new Pirellis to the
Campagnolos.
The T-Mart fellows were quite surprised how light the Turbinas were. Part of that could have been them being used to the large diameter rims becoming increasingly common on modern cars fitted with super-low profile tyres. An 18" x 8"rim, even in alloy, is still quite a chunk of metal. My 14" x 5.5"Campagnolos must have seemed toy-like by comparison.
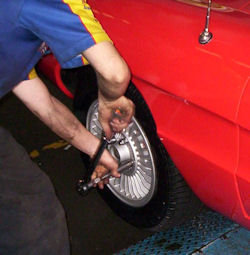
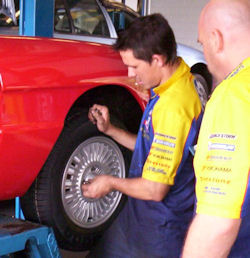 With a new tyre on the first rim, we thought it wise to do a
trial fit as these rims had never actually been on the car before. The
wheel slipped on perfectly, seated nicely, and looked a treat with four
shiny chrome wheel nuts in place.
With a new tyre on the first rim, we thought it wise to do a
trial fit as these rims had never actually been on the car before. The
wheel slipped on perfectly, seated nicely, and looked a treat with four
shiny chrome wheel nuts in place.
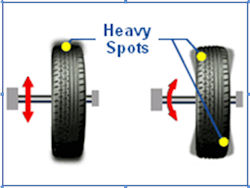
The other three rims were carefully fitted with their tyres and then it was on to balancing. Wheel balancing seems to be another of those automotive activities that is 90% science and 10% art, but as it is so important with respect to handling and tyre wear, it's worthwhile to get it done properly. There are three general types of imbalance that may need correcting in a tyre/rim assembly: static, dynamic and run-out.
Static imbalance results in vertical movement of the wheel assembly about the hub spindle and is caused by heavy or light spots in a tyre, usually formed during manufacture.
Dynamic imbalance results in lateral movement (wobble or shimmy) of the wheel on the vehicle and is caused by unequal weight on one or both sides of the wheel assembly's circumferential centerline.
 Run-out imbalance is evidenced by excessive radial and/or
lateral visual displacement of the tyre when it is spun and is caused
by tyre/rim non-uniformity (malformed tyre or warped rim), improper
bead seating, or improper match mounting of the tire and wheel/rim
assembly.
Run-out imbalance is evidenced by excessive radial and/or
lateral visual displacement of the tyre when it is spun and is caused
by tyre/rim non-uniformity (malformed tyre or warped rim), improper
bead seating, or improper match mounting of the tire and wheel/rim
assembly.
A small degree of run-out imbalance is acceptable, but too much causes vibration and excessive tire wear. Static and dynamic imbalances can be addressed by the addition of balance weights to the rim, while minor run-out imbalance can usually be reduced by careful choice of the angular location of the tyre on the rim.
Many tyre manufacturers place marks on the tyre sidewall to aid in fitting and balancing. Often there will be a yellow dot to indicate the point of lightest weight on the tyre and/or a red dot to indicate the point of maximum force from radial runout. As a starting point, an experience tyre-fitter will usually align the yellow dot relative to the valve-stem position on the rim.
 Three of my Campagnolo wheels balanced up nicely on the workshop
dynamic balancer with the addition of just small amounts of weight on
each.
Three of my Campagnolo wheels balanced up nicely on the workshop
dynamic balancer with the addition of just small amounts of weight on
each.
I wanted to avoid having any balance weights disfiguring the external face of the rims, so adhesive weights were placed on the inside surface of the rim in accordance with the digital readout of the balancing machine.
The fourth rim remained a problem-child to the end. The dedicated T-Mart technician re-fitted the tyre to the rim a couple of times before he was happy with both the run-out and the amount of balance weight required. This wheel did, however, end up with the most balance weight and we subsequently put it on the rear axle, where perfect balance is less critical.
 With all four wheels now balanced and
fitted to the car, final tightening of the wheel nuts was carried out
using a torque wrench to ensure correct tightness - a step often
ignored by inexperienced air-gun-crazy tyre fitters.
With all four wheels now balanced and
fitted to the car, final tightening of the wheel nuts was carried out
using a torque wrench to ensure correct tightness - a step often
ignored by inexperienced air-gun-crazy tyre fitters.
The hoist was then lowered and the Spider was carefully driven out of the workshop. The old steel rims were loaded aboard and Scott thoughtfully individually bagged the sets of old wheel nuts and stainless steel hubcaps.
I thanked Scott and his team for all their excellent work and pulled out into the road to drive home and try out the Spider's new shoes. The Pirellis rode very nicely indeed and were smooth and quiet. In fact, the general handling and ride were significantly improved over that of the Yohohama tyres that had been on the Spider previously. Althought I have had Yokohamas on a number of cars before - and have been very happy with them - the ones we had just taken off the Spider were very worn and fairly old. I suspect the rubber compound had hardened up considerably and the unevenly-worn tread had not helped handling either.
Once home, I was ready for the finishing touch; adding the centre-badges to the rims. As the spindle to the balancing machine passes through the centre hole of each rim, the badges can't be in place during wheel balancing. In the previous installment of this article, I explained how I had modified a set of centre badges from Alfa 33/75 alloy wheels to fit my Campagnolos. I now attached these to the centre of the rims with a carefully-applied bead of silicone sealant. Unfortunately, they will need to be prised off and reattached whenever I get the wheels balanced, but hopefully that won't be a regular occurrence.
I stood back to admire the final effect and was quite pleased with the transformation that had occurred. Since fitting the Turbinas, I have been surprised at how easy they have been to keep clean. Like all wheels, they attract road grime and brake dust, but realistically it has been no more than I found on the steel rims. A gentle scrub with a woollen wash mitt gets them clean in no time and an occasional spray with Armoral keeps the tyres black and shiny.
While looking good is nice, there is another aspect of wheel maintenance that is so simple, yet so often neglected, and that is tyre pressure. This basic task is very important to safety, comfort and overall life of tyres. Contrary to what some people seem to believe, you don't need a puncture for air to escape from your tyres! Whatever has been put in your tyres when first fitted - even nitrogen for those die-hards - will eventually get out, even if only a small bit. And a small bit can be important. The result of increasing or decreasing pressures by a couple of psi can be quite startling (as any of the Club's ALFAcomp members can attest). Choosing the correct tyre pressure, therefore, requires some thought and a little experimentation.
Like most other things about your car, the manufacturer's recommendations should be the starting point. They have spent enormous amounts of time and money determining the most effective parameters for things like tyre size, inflation pressure, steering geometry and such. While specific driving circumstances or conditions may mean tweaking of manufacturer's recommendation, they get it right for the majority of normal situations.
Unfortunately, tyre technology has improved past what, in 1972, Alfa Romeo considered standard. The owner's handbook for my Spider gives recommended cold tyre pressures, under all conditions, as: front 24.2psi and rear 25.6psi. Most tyre suppliers these days would be aghast at the thought of running such low pressures in their rubber. The advent of modern rubber compounds, improved sidewall construction, lower profiles and different suspension geometry sees pressure recommendations typically starting at around 30psi and ranging up to high 40psi - or more! In addition, the dominance of front-wheel drive cars, with large concentrations of mass over the front wheels, has resulted in a tendency to have front tyre pressures higher than rear.
On the Spider, I had run the original worn-out Yokohamas at 34psi all round. This resulted in a very firm ride and steering that was slightly skittish, however dropping the pressure below this made the steering very heavy. A quick e-mail survey of some Club members with 105 Series Alfas found that for road use, pressures in the low 30s were the most common. At the moment, I''m running 32psi all round for the Spider and am happy with the ride and handling with two adults on board. Steering effort with the Pirellis at these pressures is surprisingly light - in fact much better than the old Yokohamas at much higher pressure.
Although I check the cold-tyre pressures on my daily driver each week, the Spider gets its check as part of the pre-drive inspection I conduct each time I take it out of the garage. This simple routine also allows me to check the tyres for any undue wear or damage. I try to avoid using service station equipment for the checks as their gear is frequently inaccurate and I rarely pull into a servo with cold tyres. It is important to check cold tyre pressures because as a tyre warms from driving, the air inside expands. There can be 5psi or more difference in pressure between the cold and warm measurements of a tyre.
I have a relatively inexpensive ($20) digital tyre-pressure gauge and armed with a simple hand-pump it only takes a few minutes to do the circuit of the car. I keep the spare inflated to a higher pressure as this is the tyre that often gets bypassed if the boot has already been loaded for a journey. After all, if you need to replace a flat tyre with your spare, its not much help if the spare is flat!
With her new shoes, my Spider has been happily skipping down the highway. I am, however, still looking out for a fifth Campagnolo rim to fit to my spare tyre as well as a set of original centre badges, so if any Club members have these items squirreled away in their workshop, I'd be very interested.