Per Sempre Alfa Magazine Article
Per Sempre Alfa is the offical magazine of the Alfa Romeo Owners Club of Australia (Queensland Division). This is an on-line version of an article originally printed in the magazine and is subject to the Australian Copyright Act. Other than for the purposes of and subject to the conditions prescribed under the Copyright Act, no part of this work may in any form or by any means (electronic, mechanical, photocopying, or otherwise) be reproduced, stored in a retrieval system or transmitted without prior written permission.
Brignt and Shiny
Plastic and Queensland sunshine - not a good combination. Keith Faulkner discusses how he keeps them maintained on his Alfa Spider.
 I’ve
had my 1972 Spider Veloce for a little over a year now and have
been thoroughly enjoying the experience of topless 105 ownership.
While sophisticated engineering has always been one of the things
that set Alfas apart from most other makes, the Spider is clearly
a much simpler car than my 1989 Alfa 75 automatic. Even a mechanical
clod like myself can identify all the major components in the 105
Series engine bay and there is a strangely satisfying lack of things
like engine-management computers, air-flow sensors, electric cooling
fans, power steering pumps, air-conditioning compressors and, dare
I say it, pollution controls. The beautifully sculptured 2-litre
engine is visible in all its glory and the carburettors are simply
a work of art in themselves.
I’ve
had my 1972 Spider Veloce for a little over a year now and have
been thoroughly enjoying the experience of topless 105 ownership.
While sophisticated engineering has always been one of the things
that set Alfas apart from most other makes, the Spider is clearly
a much simpler car than my 1989 Alfa 75 automatic. Even a mechanical
clod like myself can identify all the major components in the 105
Series engine bay and there is a strangely satisfying lack of things
like engine-management computers, air-flow sensors, electric cooling
fans, power steering pumps, air-conditioning compressors and, dare
I say it, pollution controls. The beautifully sculptured 2-litre
engine is visible in all its glory and the carburettors are simply
a work of art in themselves.
I can happily tinker away changing spark plugs and checking fluids without worrying about accidentally disconnecting an electronic sensor or disturbing some critical computer setting. Even the battery can be disconnected without going through an elaborate process of protecting an on-board artificial intelligence. Don’t get me wrong - I love computer technology. After all, that’s how I make my living. But it’s also nice to reflect back on a time when things seemed much simpler and cars immersed you in the motoring experience instead of isolating you from it in a computer-managed, climate-controlled, hermetically-sealed cabin.
And I’m not sure I can conveniently use the “grumpy old bugger” excuse to justify my views. One of my young friends recently succumbed to the scooter craze (unfortunately, her battered old Alfa 33 is ready for the scrapheap) and remarked how much she had rediscovered the joy of motoring, even if it’s on two wheels. While hers is a new 125cc Vespa, it neatly recreates the simplicity of its 1950s ancestors. The young owner was amazed how much more she saw, smelt and heard while driving around. Without the distraction of even her iPod, she could devote her attention to driving and experiencing her environment. She says it is “wicked” which, I take it, is a good thing.
Of course, the picture is not as rosy as all that. A 33-year-old car such as my “simple” Spider also comes with a seemingly unending list of little maintenance jobs, but I figure that’s all part of the deal. Arguably, the most difficult things to maintain on a classic car are the rubber and plastic bits, which have a tendency to get brittle, perish or discolour. They can also be some of the hardest and most costly items to replace, so it pays to keep them in the best possible condition for as long as you can.
Our Queensland climate, with its high levels of ultra violet radiation, is not kind to these materials. Plastics and rubbers that have deteriorated are very hard to bring back from the grave, so I prefer to do regular maintenance rather than wait until things are past the point of no return.
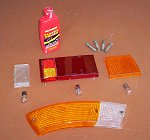
For the vinyl and rubber bits of my cars, I find liberal and regular (eg: fortnightly) application of products such as Armorall, or equivalent, keep them in reasonable condition. Each of these “protectorant” products seem slightly different; some give good absorption, but little shine, while others provide a shiny surface but leach away quickly with the next wash. Some products can also cause staining on paintwork so always read the directions carefully. I use a small paintbrush to make sure I get into all the nooks and crannies, especially around the window seals and vents. An aerosol can of Tyre Shine makes dressing the donuts an easy and quick job, and also works a treat on mudflaps.
My Spider has only a small amount of external black bits such as the windscreen surround and bumper strips, but it has acres of black vinyl interior. As I rarely go anywhere with the top up, I figure that the interior cops the same beating as my skin from the Queensland sun and accordingly make sure I give it an Armorall sunscreen each outing to match my 30+ SPF sunblock.
The clear plastic items on the car, however, require a bit more specialised care. My soft-top’s plastic rear window is in fairly good condition but was it was beginning to display a lot of fine scratches, degrading the clarity and trapping dirt. While I give the plastic a regular wipe over with a damp cloth, it obviously needed something more.
 The
British magazine Classic and Sports Cars rated “Mothers
Plastic Polish” as the top product for cleaning, reviving
and protecting plastic windows on soft-tops as well as headlight
covers and indicator lenses. I bought a bottle (around $20) from
the local auto accessories store and applied it to the outside rear
window as per the instructions. After a contortionist act I did
the same to the inside of the window, waited for it to dry and gave
it a good buff with a soft cloth.
The
British magazine Classic and Sports Cars rated “Mothers
Plastic Polish” as the top product for cleaning, reviving
and protecting plastic windows on soft-tops as well as headlight
covers and indicator lenses. I bought a bottle (around $20) from
the local auto accessories store and applied it to the outside rear
window as per the instructions. After a contortionist act I did
the same to the inside of the window, waited for it to dry and gave
it a good buff with a soft cloth.
While no product will remove internal yellowing in plastic, the Mothers product certainly did a good job of cleaning the surface, removing small scratches and generally improving clarity. The plastic also feels much more supple and soft, important when you consider how often it gets folded and unfolded.
 With
the plastic polish living up to its claim, I decided to tackle the
front and rear light clusters. The first trick was to remove the
lenses. I did this carefully, being aware that the aged plastic
would be fragile and any rubber gaskets would probably be perished.
With the attachment screws backed-off, the front lenses came off
relatively easily, although the driver-side item was suffering from
fractures around the screws (more about that later).
With
the plastic polish living up to its claim, I decided to tackle the
front and rear light clusters. The first trick was to remove the
lenses. I did this carefully, being aware that the aged plastic
would be fragile and any rubber gaskets would probably be perished.
With the attachment screws backed-off, the front lenses came off
relatively easily, although the driver-side item was suffering from
fractures around the screws (more about that later).
The front passenger-side light cluster was in much better condition than its partner. The black, un-perished gasket and the all-silver interior of the cluster indicated that it was possibly a replacement item fitted at some time in the car’s life. While I have 20 years of documented history for this Spider, there are no receipts for a replacement front light, so I guess I’ll never know for sure. Early Alfas are notorious for build differences between cars in the same series and even variations within a particular car, depending on what parts were on the shelf at the factory during assembly.
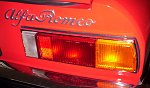
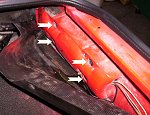 In
theory, the rear lenses are also relatively simple to remove, thanks
to an elegantly-engineered attachment method. Four knurled bolts
inside the boot unscrew to release the centre red brake-light lens.
The amber indicator lens and the clear reversing-light lens are
held in place by the brake-light lens, and come away easily once
it is removed. So much for theory. In my case, the lenses had also
been messily glued in with some sort of brown sealant that had,
over the years, turned into a congealed mess. I had to carefully
prise out the lenses with a small screwdriver and remove of much
as the hardened sealant as I could.
In
theory, the rear lenses are also relatively simple to remove, thanks
to an elegantly-engineered attachment method. Four knurled bolts
inside the boot unscrew to release the centre red brake-light lens.
The amber indicator lens and the clear reversing-light lens are
held in place by the brake-light lens, and come away easily once
it is removed. So much for theory. In my case, the lenses had also
been messily glued in with some sort of brown sealant that had,
over the years, turned into a congealed mess. I had to carefully
prise out the lenses with a small screwdriver and remove of much
as the hardened sealant as I could.
With all the lenses now removed, I sprayed them liberally with degreaser, then washed them in warm soapy water, using a toothbrush to get into all the niches.
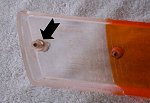 As
mentioned previously, the driver-side front lens had some damage
to the attachment posts, probably the result of some over-enthusiastic
tightening of the attachment screws. I mixed some epoxy and repaired
the breaks, also building up a reinforced shoulder of epoxy around
the other posts, some of which were also beginning to show signs
of stress cracks.
As
mentioned previously, the driver-side front lens had some damage
to the attachment posts, probably the result of some over-enthusiastic
tightening of the attachment screws. I mixed some epoxy and repaired
the breaks, also building up a reinforced shoulder of epoxy around
the other posts, some of which were also beginning to show signs
of stress cracks.
 The
next day, with the epoxy set and all the lenses clean, I found a
comfortable spot on the verandah and set to work with my bottle
of Mothers Plastic Polish. The lenses were in pretty good condition
with respect to clarity and absence of fading and the polish returned
them to a nice shiny and smooth appearance.
The
next day, with the epoxy set and all the lenses clean, I found a
comfortable spot on the verandah and set to work with my bottle
of Mothers Plastic Polish. The lenses were in pretty good condition
with respect to clarity and absence of fading and the polish returned
them to a nice shiny and smooth appearance.
With the lenses now shiny and sparkling, I turned my attention to the light assembly housings on the car. I gave the housings a good clean with degreaser and warm soapy water, using to small paintbrush to scrub away the grime. I rinsed them with a fine spray of water and dried them off with a soft cloth and hair drier set on low heat.
I used a can of aerosol electrical contact cleaner and lubricant (available from Dick Smith or similar stores) on the housing terminals and the light bulb contacts to ensure good electrical continuity and put the bulbs back in to test they were all working ok.
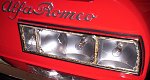
Although the housing assemblies were now clean, the reflector surfaces left something to be desired, displaying 33 years of deterioration. While it is possible to get plastic re-chromed, I decided to just re-spray the units while they were on the car, using an aerosol can of “chrome” paint.
 I
masked-off everything with tape and newspaper, taking care to ensure
the electrical terminals were well covered. I sprayed half a dozen
light coats of paint, waiting about ten minutes between each coat.
After the last coat, I removed the masking and inspected my work
to make sure everything was in order. I resisted the temptation
to put it all back together until the paint was well and truly dry
so the fumes from the curing paint wouldn’t frost the inside
of the lenses.
I
masked-off everything with tape and newspaper, taking care to ensure
the electrical terminals were well covered. I sprayed half a dozen
light coats of paint, waiting about ten minutes between each coat.
After the last coat, I removed the masking and inspected my work
to make sure everything was in order. I resisted the temptation
to put it all back together until the paint was well and truly dry
so the fumes from the curing paint wouldn’t frost the inside
of the lenses.
 The
next day, with the paint and epoxy well cured, I carefully re-assembled
everything - making sure not to overtighten the screws - and did
a final test to make sure all the bulbs were functioning properly.
The
next day, with the paint and epoxy well cured, I carefully re-assembled
everything - making sure not to overtighten the screws - and did
a final test to make sure all the bulbs were functioning properly.
One final buff with a soft cloth and the refurbishment was complete.
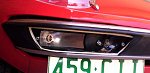
Next on the list were the headlight covers. One of the first things I did when I got the car was to refit a set of Carello headlight covers. The previous owner had junked her set of yellowed and cracked covers and not replaced them when the car was repainted. I feel that the covers complement the smooth lines on the car perfectly so reinstating them was a must for me.
Now, these bits of bent plastic don’t come cheap and you can’t exactly pick them up at Woolworths, but while in Melbourne for a computer conference, I phoned Vyvian Hirons at the 105 Factory and had a set couriered over the my hotel. I also bought a set of chromed fixing clamps and stainless-steel cuphead bolts.
Back in Brisbane, I tried to figure out how to install them. Projecting lugs at the rear of the covers are designed to engage in slots around the circumference of the headlights, while the front of the covers are held down with the clamps bolted through the bodywork. On my car, the slots around the headlamp circumference had been bogged over during the re-spray, so I poked around from behind until I found the locations and carefully opened them up again with a needle file.
Offering-up the covers to the bodywork, I discovered that the fit of the compound curves of the cover against those of the bodywork was not great. Knowing that the plastic covers would become brittle as they aged, I didn’t want to have them bolted down under stress. A couple of hours of judicious trial-and-fit shaping of the edges with an orbital sander resulted in the covers finally sitting in place reasonably well.
The following Saturday, I dropped in to APF Motors where Angelo kindly installed a couple of captive ferrules for the stainless-steel hold-down bolts using a tool that looked like an overgrown pop-riveter. I cut some thin rubber into custom-shaped washers to fit underneath the hold-down clamps and wrapped the projecting mounting lugs in electrical tape to provide some cushioning to the whole assembly.
 I
slipped the covers in place and carefully tightened up the bolts
over the hold-down clamps. The captive ferules make it simple to
remove the cover for cleaning and they also make it easier to turn
the bolts to the correct tightness.
I
slipped the covers in place and carefully tightened up the bolts
over the hold-down clamps. The captive ferules make it simple to
remove the cover for cleaning and they also make it easier to turn
the bolts to the correct tightness.
So, having sorted the soft-top window and indicator lenses, it was an easy matter to remove the headlight covers and give them a good polish with the Mothers goop, before standing back to admire the now sparkling Spider.
Why does plastic deteriorate?
For those of us old enough to remember Professor Julius Sumner Miller, consider this the "Why is it so?" segment. Ok, OK, so it's actually my greatly simplified explanation of why the inside of your Alfasud crumbled like a cookie and the dashboard of your GTV has cracks as big as the Grand Canyon. Of course, if there are any chemical engineers among Club members, feel free to provide a more comprehensive article.
While plastic is usually considered an "artificial" material, it is typically a polymer based on organic petrochemical compounds. Polymers can be described as large molecules made up of simple repeating units. The word polymer is derived from the Greek words poly meaning "many" and mer meaning "part". Many types of polymers can be created by varying the molecular composition of the repeating unit.
Being organically-based, polymers are therefore subject to degradation and breakdown through natural oxidisation. Degradation may be initiated or accelerated by numerous factors including ultraviolet light, visible light, ozone, pollutants, manufacturing impurities, oxygen, and heat. During degradation, oxidisation can result in the breaking and rearranging of chemical bonds along the polymer chain. This can begin even during the manufacturing process, due to the conditions of extreme heat or pressure that may be used to form the polymer.
To delay the onset of degradation as long as possible, both process stabilisers and long-term stabilisers are added to the polymer. The most important primary anti-oxidants used for long-term stabilisation are the sterically hindered phenols. Unfortunately, these exhibit an undesirable side effect when exposed to ultraviolet radiation. They develop deeply coloured molecular structures resulting in irreversible yellowing of the plastic. To minimise this effect, polymers are also provided with an ultra-violet stabilisation package. This package is often made up of ultraviolet absorbers (UVA) and hindered amine light stabilisers (HALS).
UVAs protect physically through molecular absorption of the high-energy fractions of sunlight. The absorption transforms the molecule into an excited state, and when it collapses back to its original state, the absorbed energy is released as a thermal emission (heat).
In contrast, HALS protect chemically by combining with oxygen when exposed to sunlight to form stable nitroxide radicals. These trap the oxidising free radicals released when the polymer is exposed to ultraviolet radiation.
Eventually, the stabilisers are either consumed or migrate to the surface of the polymer where they are abraded away. The polymer has then lost its protection and deterioration proceeds rapidly when exposed to the factors mentioned above.
In theory, after-market protectorant products provide a coating to replace or supplement the original UVAs or HALS in the polymer. They cannot, however, reverse any yellowing which is the result of degradation of the sterically hindered phenols within the polymer itself.